
Warehouse Stock Location Systems
by David Nettleton
Location systems are one of the core components of a successful warehouse operation. Their base function is providing easy, logical access to a physical location in the warehouse.
When an operator sees a location on the wireless device or paper ticket, it should immediately be clear which is the most efficient path to the desired location.
Overview
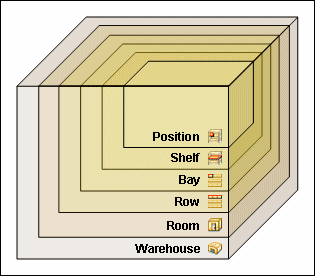
Standard nomenclature has been created for designing locations. An example might be: D-13-37-5-2.
D: Building, room, or area of warehouse
If you have a box for a warehouse, you may not need this field. This field separates physical areas of the warehouse or site. There may be separate temperature control rooms, separate buildings, or secure rooms. This code enables the operator to determine the correct area of the operation quickly.
13: Aisle
This field identifies the aisle number.
37: Bay
This field marks the bay number in the aisle, typically the locations in a rack bay. In a bulk or floor location, this is the number of the location in the row.
5: Level
This field indicates the level off the floor.
2: Position
This is the horizontal position on a rack or shelf. For instance, a shelf may be divided into four locations. The locations would be numbered 1 to 4.
This format would vary according to the type of location. Bulk or floor locations might only have area, aisle, and bay, D-13-37. An offsite warehouse may only have an area or area and aisle. The warehouse would determine the best mix designed around their operation.
Basic Principles
 There are some basic principles involved in designing an effective and efficient stock location system:
⦁ Keep It Simple
⦁ Provide Security
⦁ Make it Permanent
⦁ Make it Flexible
⦁ Make it Expandable
Simplicity
The single most important design factor in a warehouse location system is the operator. The system should be easy to learn and the operator should have an instant reaction to the location appearing on the screen. It may seem insignificant for a single task, but even fractions of a second can add up to hours in a week, given the thousands of tasks that are performed in that time.
All numbering should flow in the same direction. Left to right and front to back is most logical, since we read that way. If you have the offices or docks on the right side of the warehouse, however, then you should number right to left.
One common concern is pick path. Most commercial warehouse management systems (WMS) provide pick-path routing. Many also provide separate storage path routing. These systems eliminate the need to design your numbering system in the order you want your operators to access pick locations. Your WMS will automatically present pick/store tasks in the most efficient order.
In conclusion, “Keep It Simple, Stupid.”
Security and Check Digits
One of the great innovations of WMS has been the ability to utilize the random check digit to identify a location. These are typically three or four digits. Most commercial WMS have this function. Operators scan or enter the random check digit and not the location number when confirming a location. This greatly reduces the opportunity to use the wrong location.
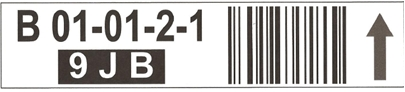
Check digits generate randomly, preventing operators from “knowing” the location before they arrive. Most WMS suppliers will generate random check digits.
Permanence
A location system with permanence allows you to have high quality labels that do not have to be replaced when the physical building or storage equipment changes.
One of the most frustrating aspects of warehouse redesign is adding rack to a poorly designed location system. Try adding rack before location “A” or “01.” Consider building configuration in location design.
If you have a 40-foot dock area, consider that at some point you may want to add racks to the front of some of the rows. If you made the first bay “01,” you will have to come up with a poor numbering system (see Simplicity) or renumber the entire row (think: wasted labor).
The simple solution is to number all locations from a physical wall. In the previous example, you would consider the first bay at the dock. Since the first location is 40 feet from the dock, the first bay would be “06,” assuming eight-foot bays. The same process applies to the aisles. You may have a bulk or work-in-progress area to the left of the first aisle. Calculate the space needed to fill in that space with aisles and start your first aisle with the next letter/number. This will allow adding aisles later without a major relabeling effort.
The process for levels would be similar. Consider you will have some locations that are full pallets and some that are half pallets. You will have 4-high in the pallet area and 8-high in the half-pallet area. You would number the half-pallet levels 1 to 8. You would number the pallet levels 1, 3, 5 and 7. These levels would match the same number level in the half pallets. This simplifies the process of converting pallets to half-pallets and vice versa. This also allows for easier equipment configuration, discussed in another section.
Flexibility
One of the most common issues in location numbering comes from the changing use of the racks, shelves, and bins. Your business is changing and you want to convert several sections of rack from pallet storage to case pick locations. Do you mix products in the location or renumber the locations to accommodate the change?
I have learned from the school of hard knocks that you can minimize this problem by following one rule:
Use physical barriers for numbering delineation.
Physical barriers could be building components such as walls, columns, or HVAC equipment. Storage equipment also provides physical barriers. Examples are rack-uprights or self-uprights (end supports).
These uprights would not change in a warehouse configuration. If you are changing uprights, you will most likely change the whole warehouse or area and redesign the location system.
More commonly, you will change the use of the shelf or rack beam. You may convert a rack beam from two pallets to eight case pick locations. If you did not use position and consecutively numbered all the locations, you would be replacing all labels. Then the upper pallet levels would not match the case pick levels, further confusing the operator.
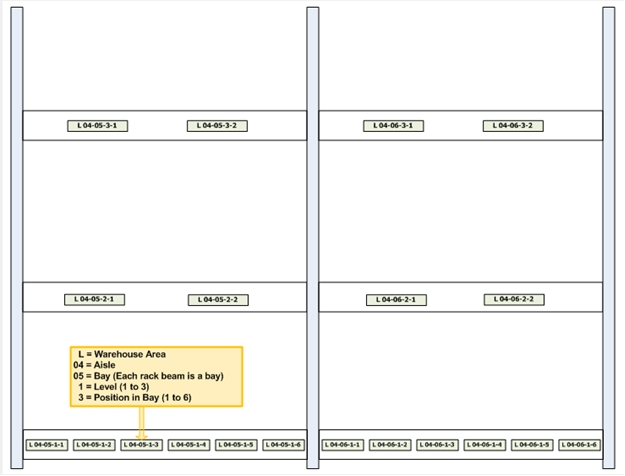
If you create the position field, the bay will never change. You would simply create additional labels for the added locations. Upper and lower levels would still have the same bay numbers, even with different storage types.
The picture below provides an example of this type of numbering.
Expandability
Another consideration is building expansion. Many building designs include expansion areas to allow for future business growth.
The location system design should account for this expansion. If the docks run east-to-west and the expansion area is to the west, then number the aisles east-to-west. The same would be true for bays if the expansion were to the north.
Zone Configuration
There are other descriptors utilized in location nomenclature. The most common is zone. Zones are more of a descriptor than part of the location definition.
Zones can define specific characteristics of a location. There are as many characteristics as there are warehouse designs. Some examples would include:
Item Velocity
Assume we have case flow rack. There are four levels. We want the highest velocity items on Level 3 so they are at chest height. All Level 3 locations would have Zone 1. The lowest volume items would slot on the top level because it is above our heads. They would have Zone 4. This allows the WMS to find the appropriate location for an item quickly.
Package Size
The same case flow rack may have to store large cartons. We may want to set the bottom level in each bay to a separate zone so the large items slot to the bottom level.
Product Weight
You may have unusual weight. We had to store ballasts in a warehouse for lighting fixtures and bulbs. We had special rack in some parts of the warehouse to store the ballasts. These had a separate zone to ensure they were never stored in the lower capacity rack.
Location Capacity
The next facet of location design is capacity. Capacity is the ability to define the amount of product that will fit in a location for the warehouse management system.
One common theme in all the methods is accurate product information. If you do not have accurate case weights and measurements, you must invest in creating this information. It is critical to a successful WMS. There are a couple of weighing systems available to assist with this process. These devices will automatically weigh and measure the case and record the information electronically. There are purchase and rental options.
There are multiple theories and methods to identify capacity. Each has benefits and weaknesses.
Cube Capacity
“Water fill” is another description of this method. Most WMS configurations utilize this as the primary method. It calculates the percent of cube utilized in the location. If a location has a capacity of 100 cubic feet and a pallet of 35 cases with 2.5 cubic feet, then the location is 87.5 percent of maximum capacity. Most WMS allow the operator to establish the maximum allowable percent capacity.
Advantages: this is the simplest system to manage. All the location capacities and product capacities are in the system. It is the most effective system for locations with multiple products.
Disadvantages: it has the most inherent accuracy issues. Bulk locations hold so many items, the calculation often sends multiple extra pallets to a location because it still sees extra space. It does not account for large dimensions (see next section).
Product Dimensions
This calculation takes the length, width, and height of a case or pallet and compares these dimensions to the location dimensions. If it cannot fit each of the three dimensions into the location, it rejects the location for that product.
Advantages: this method may be utilized in conjunction with cube to eliminate the cube capacity issue.
Disadvantages: it is very inaccurate when not utilized with cube.
Case/Pallet Capacity
An alternative is defining the amount of an item that will fit in a location. This is less widely available in WMS offerings. It literally defines the cases/pallets of an item that will fit in a location.
An example would be bulk locations. Assume a location is four deep and three high. The WMS would know there is a 12-pallet maximum in this location. The WMS may state the maximum in pallets, cases or units. If the pallet has 56 cases and 12 units per case, then the maximum would be 8,056 units.
A case flow lane may fit seven cases. The maximum would be seven cases, or 56 units.
Advantages: this method will provide more accurate information than the cube calculation. It is most effective when case size varies and cube has difficulty calculating accurate capacity.
Disadvantages: this method requires more work. The operation must develop these capacities by item and location type. Utilizing Microsoft Excel® spreadsheets or Microsoft Access® programs will minimize this effort. This method has significant issues when multiple products are in one location.
In conclusion, make the effort to define your location system effectively before implementation. You will achieve greater productivity and experience less frustration in the future.
Articles in This Series


Call Us! 877-674-7495 info@dksco1.com